RunLoop 概念 顾名思义,RunLoop 就是运行循环,在程序运行过程中循环做一些事情。这种模型通常被称作 Event Loop ,这种模型的关键点在于:如何管理事件/消息,如果保证线程在没有处理消息时休眠避免资源占用、再有消息到来时立刻被唤醒。
一般来说,一个线程一次只能执行一次任务,执行完成后线程就会退出,如果要保证线程能随时处理事件但不退出,我们可能需要这样做:
1
2
3
4
5
6
7
8
9
10
11
12
int main(int argc, char * argv[]) { @autoreleasepool { int retVal = 0; do { // 睡眠中等待消息 int message = sleep_and_wait(); // 处理消息 retVal = process_message(message); } while (retVal == 0); return 0; } }
RunLoop 其实就是一个对象,这个对象管理了其需要处理的消息和事件,并且提供了一个入口函数来执行上面的 Event Loop 逻辑。线程执行了这个函数后,会一直处于:接受消息->等待->处理消息 的循环中,直到 retVal 为0才会退出函数。
可以在这里 下载到 CoreFoundation的源码来查看具体实现。
RunLoop 结构 iOS 有两套 API 来访问和使用 RunLoop:NSRunLoop、CFRunLoop。NSRunLoop 是基于 CFRunLoop 的包装
Core Foundation 中关于 RunLoop 的类有5个:
CFRunLoopRef
CFRunLoopModeRef
CFRunLoopSourceRef
CFRunLoopTimerRef
CFRunLoopObserverRef
CFRunLoopRef:
1
2
3
4
5
6
7
8
struct __CFRunLoop { pthread_t _pthread; CFMutableSetRef _commonModes; CFMutableSetRef _commonModeItems; CFRunLoopModeRef _currentMode; CFMutableSetRef _modes; };
CFRunLoopModeRef:
1
2
3
4
5
6
7
struct __CFRunLoopMode { CFStringRef _name; CFMutableSetRef _sources0; CFMutableSetRef _sources1; CFMutableArrayRef _observers; CFMutableArrayRef _timers; };
这里有个概念叫做 commonModes:一个 mode 可以将自己标记为 common 属性(通过将其 mode name 添加到 RunLoop 的 commonModes 中)。每当 RunLoop 内容发生时,RunLoop 会自动将 commonModeItems 里面的 source/observer/timer 同步到具有 common 标记的所有 mode 里面。
CFRunLoop 对外暴露的管理 mode 的接口有两个:
1
2
CFRunLoopAddCommonMode(CFRunLoopRef runloop, CFStringRef modeName); CFRunLoopRunInMode(CFStringRef modeName, ...);
mode 暴露的管理 mode item 的接口有以下几个
1
2
3
4
5
6
CFRunLoopAddSource(CFRunLoopRef rl, CFRunLoopSourceRef source, CFStringRef modeName); CFRunLoopAddObserver(CFRunLoopRef rl, CFRunLoopObserverRef observer, CFStringRef modeName); CFRunLoopAddTimer(CFRunLoopRef rl, CFRunLoopTimerRef timer, CFStringRef mode); CFRunLoopRemoveSource(CFRunLoopRef rl, CFRunLoopSourceRef source, CFStringRef modeName); CFRunLoopRemoveObserver(CFRunLoopRef rl, CFRunLoopObserverRef observer, CFStringRef modeName); CFRunLoopRemoveTimer(CFRunLoopRef rl, CFRunLoopTimerRef timer, CFStringRef mode);
这里只能通过 mode name 来操作内部的 mode,当传入一个新的 mode name 单 RunLoop 里面没有对应的 mode 时,RunLoop 内部会自动创建 CFRunLoopModeRef。对于一个 Runloop 来说,内部的 mode 只能增加,不能删除。
苹果公开的 mode 有两个
kCFRunLoopDefaultMode(NSDefaultRunLoopMode)
UITrackingRunLoopMode
这里还提供了一个操作 common 标记符的字符串 kCFRunLoopCommonModes (NSRunLoopCommonModes)。使用时注意这个标记和其他的 mode name。
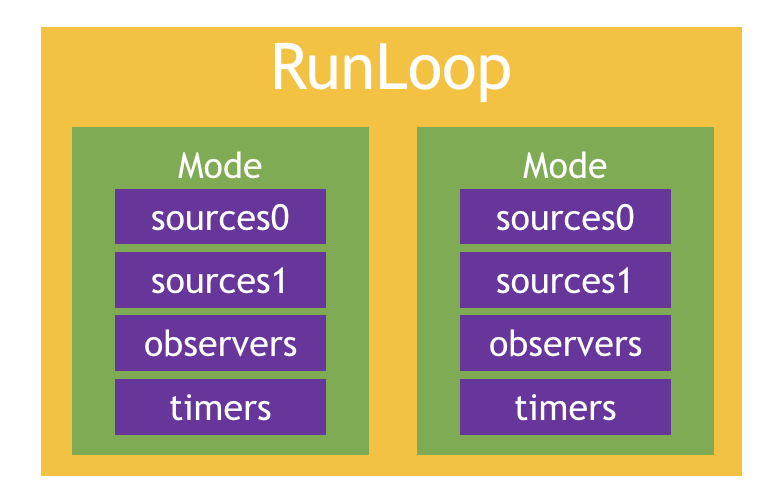
看下 RunLoop 图示结构:
从上图的结构可以看到,一个 RunLoop 包含若干个 mode,每个 mode 有包含若干个 source/observer/timer,每次调用 RunLoop 的主函数时,只能指定其中一个 mode 作为 currentMode。如果需要切换 mode,只能退出当前 loop,再重新指定一个 mode 进入。这样做是为了不同组的 source/observer/timer,可以做到互不影响。
CFRunLoopSourceRef 是事件产生的地方。source 有两个版本:source0 和 source1
source0:只包含了一个回调(函数指针),它并不能主动触发事件。使用时需要先调用 CFRunLoopSourceSignal(source),将这个 source 标记为待处理,然后手动调用 CFRunLoopWakeUp(runloop) 来唤醒 RunLoop,让其处理这个事件。 – 触摸事件处理、performSelector:onThread;
source1:包含了一个 mach_port 和一个回调(函数指针),被用于通过内核和其他线程相互发送消息,这种 source 能主动唤醒 RunLoop 的线程。 – 基于 port 的线程间通信、系统事件捕捉。
CFRunLoopTimerRef 是基于事件的触发器,它和 NSTimer 是可以混用的。当加入到 RunLoop 时,RunLoop 会注册对应的时间点,当时间点到时,RunLoop 会被唤醒以执行那个任务。 – NSTimer、performSelector:withObject:afterDelay:
CFRunLoopObserverRef 是观察者,每个 observer 都包含了一个回调,当 RunLoop 的状态发生改变时,观察者就能通过回调接收到这个变化。
– 用于监听 RunLoop 的状态、UI 刷新(BeforeWaiting)、Autorelease pool(BeforeWaiting)
可以观测到的状态有一下几个:
1
2
3
4
5
6
7
8
9
10
/* Run Loop Observer Activities */ typedef CF_OPTIONS(CFOptionFlags, CFRunLoopActivity) { kCFRunLoopEntry = (1UL << 0), // 即将进入 RunLoop kCFRunLoopBeforeTimers = (1UL << 1), // 即将处理 timer kCFRunLoopBeforeSources = (1UL << 2), // 即将处理 source kCFRunLoopBeforeWaiting = (1UL << 5), // 即将进入休眠 kCFRunLoopAfterWaiting = (1UL << 6), // 即将被唤醒 kCFRunLoopExit = (1UL << 7), // 即将退出 RunLoop kCFRunLoopAllActivities = 0x0FFFFFFFU };
上面的 source/timer/observer 统称为 mode item,一个 item 可以被同时加入多个 mode,但一个 item 被重复加入同一个 mode 是不会有效果的。如果一个 mode 里面一个 item 都没有,则 RunLoop 会直接退出,不进入循环。
RunLoop 与线程的关系 每条线程都有唯一一个与之对应的 RunLoop 对象,他们是一一对应的。
线程在刚创建时是没有 RunLoop 对象的,RunLoop 会在第一次获取它时创建,我们通常获取的方式有以下几种:
1
2
3
4
CFRunLoopGetCurrent(); CFRunLoopGetMain(); [NSRunLoop currentRunLoop]; [NSRunLoop mainRunLoop];
来看下获取的源码,已 getCurrent 为例:
1 2 3 4 5 6 7 8 9 10 11 12 13 14 15 16 17 18 19 20 21 22 23 24 25 26 27 28 29 30 31 static CFMutableDictionaryRef __CFRunLoops = NULL ;static CFLock_t loopsLock = CFLockInit; CF_EXPORT CFRunLoopRef _CFRunLoopGet0(pthread_t t) { if (pthread_equal(t, kNilPthreadT)) { t = pthread_main_thread_np(); } if (!__CFRunLoops) { CFMutableDictionaryRef dict = CFDictionaryCreateMutable(kCFAllocatorSystemDefault, 0 , NULL , &kCFTypeDictionaryValueCallBacks); CFRunLoopRef mainLoop = __CFRunLoopCreate(pthread_main_thread_np()); CFDictionarySetValue(dict, pthreadPointer(pthread_main_thread_np()), mainLoop); } CFRunLoopRef loop = (CFRunLoopRef)CFDictionaryGetValue(__CFRunLoops, pthreadPointer(t)); if (!loop) { CFRunLoopRef newLoop = __CFRunLoopCreate(t); CFDictionarySetValue(__CFRunLoops, pthreadPointer(t), newLoop); } _CFSetTSD(__CFTSDKeyRunLoopCntr, (void *)(PTHREAD_DESTRUCTOR_ITERATIONS-1 ), (void (*)(void *))__CFFinalizeRunLoop); return loop; }
有源码分析可知:
线程和 RunLoop 是一一对应的
RunLoop 保存在一个全局的 Dictionary 里面,pthread_t 为 key,RunLoop 为 value
线程刚创建时并没有 RunLoop,RunLoop 会在第一次获取它时创建
RunLoop 会在线程结束时销毁
只能在线程内部获取 RunLoop(主线程除外)
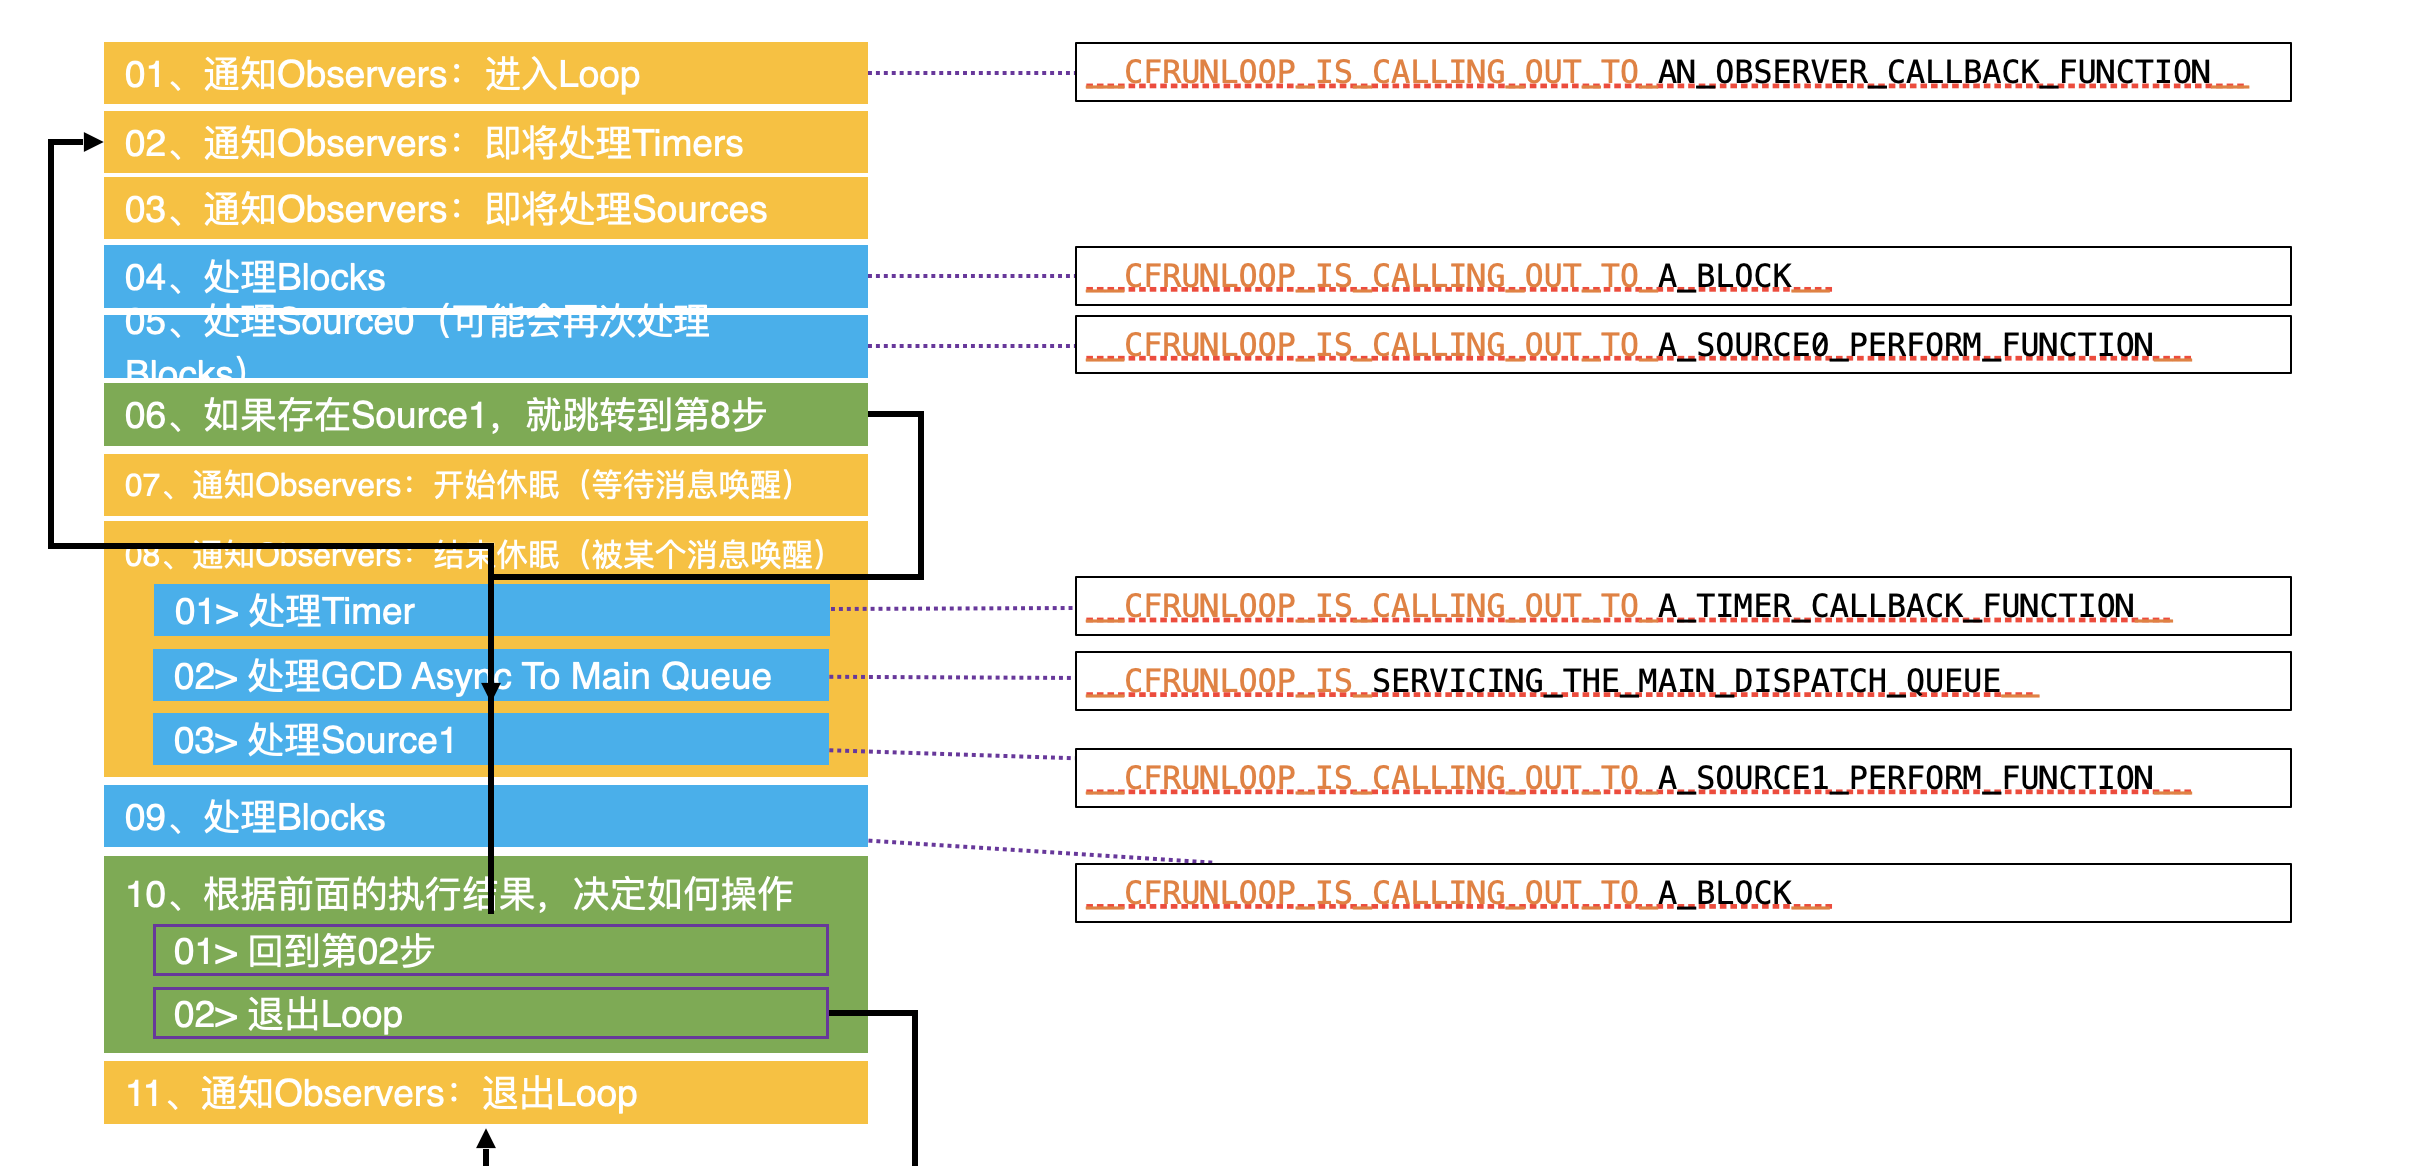
4、RunLoop 的运行逻辑 先来看流程图:
来分析下源码:
1
2
3
4
5
6
7
8
9
10
11
12
13
14
15
16
17
18
19
20
21
22
23
24
25
26
27
28
29
30
31
32
33
34
35
36
37
38
39
40
41
42
43
44
45
46
47
48
49
50
51
52
53
54
55
56
57
58
59
60
61
62
63
64
65
66
67
68
69
70
71
72
73
74
75
76
77
78
79
80
81
82
83
84
85
86
87
88
89
90
91
92
93
94
95
96
97
98
99
100
101
102
103
104
105
106
107
108
109
110
111
112
113
114
115
void CFRunLoopRun(void) { /* DOES CALLOUT */ int32_t result; do { result = CFRunLoopRunSpecific(CFRunLoopGetCurrent(), kCFRunLoopDefaultMode, 1.0e10, false); } while (kCFRunLoopRunStopped != result && kCFRunLoopRunFinished != result); } SInt32 CFRunLoopRunSpecific(CFRunLoopRef rl, CFStringRef modeName, CFTimeInterval seconds, Boolean returnAfterSourceHandled) { /* DOES CALLOUT */ /// 根据 mode name 找打对应 mode CFRunLoopModeRef currentMode = __CFRunLoopFindMode(rl, modeName, false); /// 如果 mode 里面没有 source/timer/observer 则直接返回 if (__CFRunLoopModeIsEmpty(rl, currentMode, rl->_currentMode)) { return; } volatile _per_run_data *previousPerRun = __CFRunLoopPushPerRunData(rl); CFRunLoopModeRef previousMode = rl->_currentMode; rl->_currentMode = currentMode; int32_t result = kCFRunLoopRunFinished; /// 1、通知 observer 即将进入 loop __CFRunLoopDoObservers(rl, currentMode, kCFRunLoopEntry); /// 进入 RunLoop result = __CFRunLoopRun(rl, currentMode, seconds, returnAfterSourceHandled, previousMode); /// 11、通知 observer 退出 loop __CFRunLoopDoObservers(rl, currentMode, kCFRunLoopExit); return result; } /* rl, rlm are locked on entrance and exit */ static int32_t __CFRunLoopRun(CFRunLoopRef rl, CFRunLoopModeRef rlm, CFTimeInterval seconds, Boolean stopAfterHandle, CFRunLoopModeRef previousMode) { int32_t retVal = 0; do { // 2、通知Observers:即将处理Timers __CFRunLoopDoObservers(rl, rlm, kCFRunLoopBeforeTimers); // 3、通知Observers:即将处理Sources __CFRunLoopDoObservers(rl, rlm, kCFRunLoopBeforeSources); // 4、处理Blocks __CFRunLoopDoBlocks(rl, rlm); // 5、处理Source0 Boolean sourceHandledThisLoop = __CFRunLoopDoSources0(rl, rlm, stopAfterHandle); if (sourceHandledThisLoop) { // 处理Blocks __CFRunLoopDoBlocks(rl, rlm); } Boolean poll = sourceHandledThisLoop || (0ULL == timeout_context->termTSR); // 6、判断有无Source1 if (__CFRunLoopServiceMachPort(dispatchPort, &msg, sizeof(msg_buffer), &livePort, 0, &voucherState, NULL)) { // 如果有Source1 则跳转到 handle_msg -- 即 第 8 步 goto handle_msg; } // 7、通知Observers:即将休眠 __CFRunLoopDoObservers(rl, rlm, kCFRunLoopBeforeWaiting); __CFRunLoopSetSleeping(rl); // 等待别的消息唤醒当前线程 __CFRunLoopServiceMachPort(waitSet, &msg, sizeof(msg_buffer), &livePort, poll ? 0 : TIMEOUT_INFINITY, &voucherState, &voucherCopy); // user callouts now OK again __CFRunLoopUnsetSleeping(rl); // 8、通知Observers:结束休眠 -- 被某个消息唤醒 __CFRunLoopDoObservers(rl, rlm, kCFRunLoopAfterWaiting); handle_msg: if (被timer唤醒) { // 8.1、处理Timers __CFRunLoopDoTimers(rl, rlm, mach_absolute_time()); } else if (被GCD唤醒) { // 8.2、处理 GCD __CFRUNLOOP_IS_SERVICING_THE_MAIN_DISPATCH_QUEUE__(msg); } else { // 8.3、处理Source1 __CFRunLoopDoSource1(rl, rlm, rls, msg, msg->msgh_size, &reply); } // 9、处理BLocks __CFRunLoopDoBlocks(rl, rlm); // 10、根据当前结果决定如何操作 // -- 1> 回到第 2 步 // -- 2> 退出 RunLoop if (sourceHandledThisLoop && stopAfterHandle) { // 进入 loop 时处理完事件就返回 retVal = kCFRunLoopRunHandledSource; } else if (timeout_context->termTSR < mach_absolute_time()) { // 超出传入参数标记的时间了 retVal = kCFRunLoopRunTimedOut; } else if (__CFRunLoopIsStopped(rl)) { // 被外部调用强制停止了 __CFRunLoopUnsetStopped(rl); retVal = kCFRunLoopRunStopped; } else if (__CFRunLoopModeIsEmpty(rl, rlm, previousMode)) { // source/timer/observer 一个都没有时 retVal = kCFRunLoopRunFinished; } voucher_mach_msg_revert(voucherState); os_release(voucherCopy); } while (0 == retVal); return retVal; }
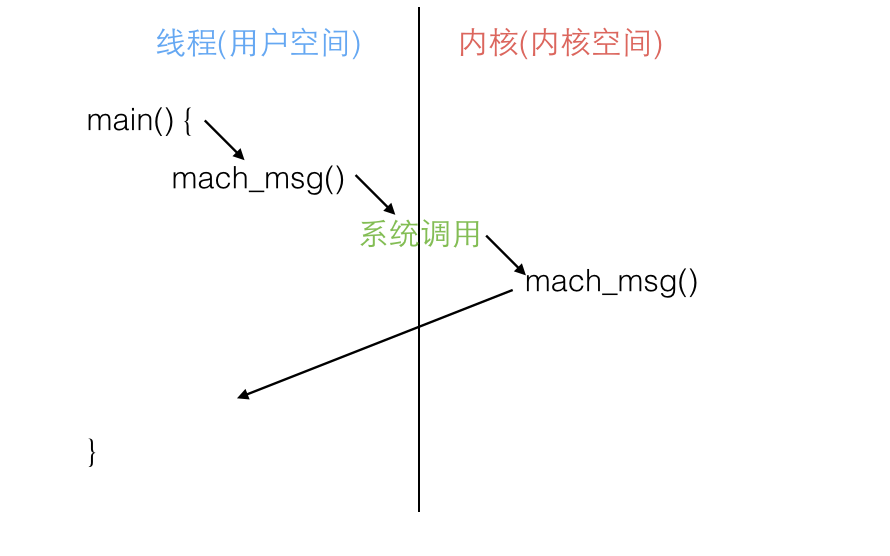
来看下 RunLoop 休眠原理:
RunLoop 应用 NSTimer 我们知道 NSTimer 是一个不准确的定时器,是有误差的。
当一个 NSTimer 注册到 RunLoop 后,RunLoop 会为其重复的时间点注册好事件。RunLoop 为了节省资源,并不会在非常准确的时间点回调这个 Timer。Timer 有个属性叫做 tolerance(宽容度),标示了当时间点到后,容许有多少最大误差。
1
2
3
4
5
6
7
8
9
10
11
12
13
14
15
struct __CFRunLoopTimer { CFRuntimeBase _base; uint16_t _bits; pthread_mutex_t _lock; CFRunLoopRef _runLoop; CFMutableSetRef _rlModes; CFAbsoluteTime _nextFireDate; CFTimeInterval _interval; CFTimeInterval _tolerance; uint64_t _fireTSR; CFIndex _order; CFRunLoopTimerCallBack _callout; CFRunLoopTimerContext _context; };
如果 timer 错过了某个时间点,例如执行一个很长的任务,则这个时间点的回调也会跳过去,不会延后执行。所以错过了就需要等下一次的 loop,这也就是 timer 不准确的原因。
再有就是 Timer 在滑动时会失效的问题。因为 RunLoop 只能选择一个 mode 运行,如果 timer 处于 kCFRunLoopDefaultMode 时,此时界面滑动,RunLoop 会切换到另一种模式:UITrackingRunLoopMode,此时界面处于跟踪 mode,此种模式用于 scrollView 追踪触摸滑动,保证界面滑动时不受其他 mode 影响,但是相对了也会使处于 default mode 的 timer 失效。
有两种方式解决:
将 timer 依次加入到上述两个 mode 里面
将 timer 放到顶层的 commonModeItems 里面,commonModeItems 会被 RunLoop 自动更新到具有 common 属性的 mode 里面去
GCD GCD 的某些接口也用到了 RunLoop,例如:
1 2 3 4 5 6 7 8 9 dispatch_async(dispatch_get_global_queue (0 , 0 ), ^{ // 处理一些子线程的逻辑 // 回到主线程去刷新UI界面 dispatch_async(dispatch_get_main_queue (), ^{ }) })
当调用 dispatch_async(dispatch_get_main_queue(), ^{}) 时,libDispatch 会向主线程的 RunLoop 发送消息,RunLoop 会被唤醒,并从消息中取得这个 block,并在回调里面执行这个 block。这个逻辑仅限于 dispatch 到主线程,dispatch 到其他线程仍然是有 libDispatch 处理的。
看下面的例子:
1
2
3
4
5
6
7
8
9
10
11
12
13
14
15
16
17
18
19
20
21
22
23
24
25
26
27
28
29
30
31
32
33
34
35
36
37
- (void)viewDidLoad { [super viewDidLoad]; dispatch_async(dispatch_get_global_queue(0, 0), ^{ [self performSelector:@selector(test1)]; [self performSelector:@selector(test2) withObject:nil]; [self performSelector:@selector(test3) withObject:nil withObject:nil]; [self performSelector:@selector(test4) withObject:nil afterDelay:0]; [self performSelector:@selector(test5) onThread:[NSThread currentThread] withObject:nil waitUntilDone:NO]; // [[NSRunLoop currentRunLoop] addPort:[NSPort new] forMode:NSDefaultRunLoopMode]; // [[NSRunLoop currentRunLoop] run]; }); } - (void)test1 { NSLog(@"%s", __func__); } - (void)test2 { NSLog(@"%s", __func__); } - (void)test3 { NSLog(@"%s", __func__); } - (void)test4 { NSLog(@"%s", __func__); } - (void)test5 { NSLog(@"%s", __func__); }
当没有在子线程获取 RunLoop 时,是没有 test4 和 test5 方法打印的,当添加 RunLoop 时才会有方法打印。因为子线程默认是没有 RunLoop 的。
来看下 [self performSelector:@selector(test4) withObject:nil afterDelay:0];的调用栈:
1
2
3
4
5
6
7
8
9
10
11
12
13
14
15
16
17
18
* thread #4 , queue = 'com.apple.root.default-qos' , stop reason = breakpoint 1.1 * frame #0 : 0x0000000109013387 Interview01-runloop流程`-[ViewController test4](self=0x00007fd80c40b680 , _cmd="test4" ) at ViewController.m:66 :5 frame #1 : 0x00007fff25958d64 Foundation`__NSFireDelayedPerform + 420 frame #2 : 0x00007fff23da2414 CoreFoundation`__CFRUNLOOP_IS_CALLING_OUT_TO_A_TIMER_CALLBACK_FUNCTION__ + 20 frame #3 : 0x00007fff23da20ae CoreFoundation`__CFRunLoopDoTimer + 1038 frame #4 : 0x00007fff23da170a CoreFoundation`__CFRunLoopDoTimers + 282 frame #5 : 0x00007fff23d9c35e CoreFoundation`__CFRunLoopRun + 1950 frame #6 : 0x00007fff23d9b8a4 CoreFoundation`CFRunLoopRunSpecific + 404 frame #7 : 0x00007fff25957c71 Foundation`-[NSRunLoop(NSRunLoop) runMode:beforeDate:] + 211 frame #8 : 0x00007fff25957e85 Foundation`-[NSRunLoop(NSRunLoop) run] + 76 frame #9 : 0x0000000109013254 Interview01-runloop流程`__29-[ViewController viewDidLoad]_block_invoke(.block_descriptor=0x00006000022fe3d0 ) at ViewController.m:48 :9 frame #10 : 0x000000010927af11 libdispatch.dylib`_dispatch_call_block_and_release + 12 frame #11 : 0x000000010927be8e libdispatch.dylib`_dispatch_client_callout + 8 frame #12 : 0x000000010927e2d8 libdispatch.dylib`_dispatch_queue_override_invoke + 1022 frame #13 : 0x000000010928d399 libdispatch.dylib`_dispatch_root_queue_drain + 351 frame #14 : 0x000000010928dca6 libdispatch.dylib`_dispatch_worker_thread2 + 135 frame #15 : 0x00007fff522b39f7 libsystem_pthread.dylib`_pthread_wqthread + 220 frame #16 : 0x00007fff522b2b77 libsystem_pthread.dylib`start_wqthread + 15
可以看出触发的是 timer。
再来看下 [self performSelector:@selector(test5) onThread:[NSThread currentThread] withObject:nil waitUntilDone:NO];的调用栈:
1
2
3
4
5
6
7
8
9
10
11
12
13
14
15
16
17
18
* thread #4 , queue = 'com.apple.root.default-qos' , stop reason = breakpoint 2.1 * frame #0 : 0x00000001090133b7 Interview01-runloop流程`-[ViewController test5](self=0x00007fd80c40b680 , _cmd="test5" ) at ViewController.m:70 :5 frame #1 : 0x00007fff2596de42 Foundation`__NSThreadPerformPerform + 209 frame #2 : 0x00007fff23da1c91 CoreFoundation`__CFRUNLOOP_IS_CALLING_OUT_TO_A_SOURCE0_PERFORM_FUNCTION__ + 17 frame #3 : 0x00007fff23da1bbc CoreFoundation`__CFRunLoopDoSource0 + 76 frame #4 : 0x00007fff23da1394 CoreFoundation`__CFRunLoopDoSources0 + 180 frame #5 : 0x00007fff23d9bf8e CoreFoundation`__CFRunLoopRun + 974 frame #6 : 0x00007fff23d9b8a4 CoreFoundation`CFRunLoopRunSpecific + 404 frame #7 : 0x00007fff25957c71 Foundation`-[NSRunLoop(NSRunLoop) runMode:beforeDate:] + 211 frame #8 : 0x00007fff25957e85 Foundation`-[NSRunLoop(NSRunLoop) run] + 76 frame #9 : 0x0000000109013254 Interview01-runloop流程`__29-[ViewController viewDidLoad]_block_invoke(.block_descriptor=0x00006000022fe3d0 ) at ViewController.m:48 :9 frame #10 : 0x000000010927af11 libdispatch.dylib`_dispatch_call_block_and_release + 12 frame #11 : 0x000000010927be8e libdispatch.dylib`_dispatch_client_callout + 8 frame #12 : 0x000000010927e2d8 libdispatch.dylib`_dispatch_queue_override_invoke + 1022 frame #13 : 0x000000010928d399 libdispatch.dylib`_dispatch_root_queue_drain + 351 frame #14 : 0x000000010928dca6 libdispatch.dylib`_dispatch_worker_thread2 + 135 frame #15 : 0x00007fff522b39f7 libsystem_pthread.dylib`_pthread_wqthread + 220 frame #16 : 0x00007fff522b2b77 libsystem_pthread.dylib`start_wqthread + 15
这次触发的是 source0。
线程保活 我们知道当线程在执行完当前任务后就会退出,那么如果想要线程在执行完任务后依然保留,当我们彻底不需要时再将线程退出。这个时候就需要使用 RunLoop 来做到线程保活,我们自己来控制线程的生命周期。
来做个测试:
1
2
3
4
5
6
7
8
9
10
11
12
13
14
15
16
17
18
19
20
21
22
23
24
25
26
27
28
29
30
31
32
33
34
35
36
37
38
39
40
@interface XFThread : NSThread @end @implementation XFThread - (void)dealloc { NSLog(@"%s", __func__); } @end @interface ViewController () @property (nonatomic, strong) XFThread * thread; @end @implementation ViewController - (void)viewDidLoad { [super viewDidLoad]; self.thread = [[XFThread alloc] initWithBlock:^{ NSLog(@"---- tread begin -----"); NSLog(@"---- tread end -----"); }]; [self.thread start]; } - (void)dealloc { NSLog(@"%s", __func__); [self stop:nil]; } - (void)touchesBegan:(NSSet<UITouch *> *)touches withEvent:(UIEvent *)event { [self performSelector:@selector(threadAction) onThread:self.thread withObject:nil waitUntilDone:NO]; NSLog(@"%s", __func__); } - (void)threadAction { NSLog(@"%s", __func__); } @end
当 push 进 ViewController 时,可以看到 thread 的 begin、end 都已经打印完,此时当我们点击屏幕的时候,并没有走 threadAction方法,而当把 waitUntilDone 参数设置为 YES 时,会直接报出坏内存访问的 crash,因为线程在 start 时已经执行完任务了,这条线程已经是一个没用的线程,不能再用来执行任务了。
这是就需要用到了 RunLoop:
1
2
3
4
5
6
7
8
9
10
11
12
13
14
15
16
17
18
19
20
21
22
23
24
25
26
27
28
- (void)viewDidLoad { [super viewDidLoad]; self.thread = [[XFThread alloc] initWithBlock:^{ NSLog(@"---- tread begin -----"); [[NSRunLoop currentRunLoop] addPort:[[NSPort alloc] init] forMode:NSDefaultRunLoopMode]; [[NSRunLoop currentRunLoop] run]; NSLog(@"---- tread end -----"); }]; [self.thread start]; } - (IBAction)stop:(id)sender { [self performSelector:@selector(stopThread) onThread:self.thread withObject:nil waitUntilDone:NO]; } - (void)stopThread { CFRunLoopStop(CFRunLoopGetCurrent()); NSLog(@"%s", __func__); } - (void)dealloc { NSLog(@"%s", __func__); [self stop:nil]; }
添加 RunLoop 后再增加一个 stop 按钮,当点击 stop 时,我们发现并没有执行 tread end。这是因为 run 方法导致的,来看下 run 方法的官方解释:
Discussion If no input sources or timers are attached to the run loop, this method exits immediately; otherwise, it runs the receiver in the NSDefaultRunLoopMode by repeatedly invoking runMode:beforeDate:
Manually removing all known input sources and timers from the run loop is not a guarantee that the run loop will exit. macOS can install and remove additional input sources as needed to process requests targeted at the receiver’s thread. Those sources could therefore prevent the run loop from exiting.
If you want the run loop to terminate, you shouldn’t use this method. Instead, use one of the other run methods and also check other arbitrary conditions of your own, in a loop. A simple example would be:
1
2
3
4
> BOOL shouldKeepRunning = YES; // global > NSRunLoop *theRL = [NSRunLoop currentRunLoop]; > while (shouldKeepRunning && [theRL runMode:NSDefaultRunLoopMode beforeDate:[NSDate distantFuture]]); >
where shouldKeepRunning is set to NO somewhere else in the program.
可以看到 run 方法是用来设置永不销毁的线程的,如果想要控制线程的生命周期,需要使用 example 里面的方法。来试下:
1
2
3
4
5
6
7
8
9
10
11
12
13
14
15
16
17
18
19
20
21
22
23
24
25
26
27
28
29
30
31
32
33
34
35
36
37
38
39
40
41
42
43
44
45
46
47
48
49
50
51
52
53
54
55
56
57
58
59
@interface ViewController () @property (nonatomic, strong) XFThread * thread; @property (nonatomic, assign, getter=isStoped) BOOL stoped; @end - (void)viewDidLoad { [super viewDidLoad]; typeof(self) __weak weakSelf = self; self.stoped = NO; self.thread = [[XFThread alloc] initWithBlock:^{ NSLog(@"---- tread begin -----"); [[NSRunLoop currentRunLoop] addPort:[[NSPort alloc] init] forMode:NSDefaultRunLoopMode]; while (weakSelf && !weakSelf.isStoped) { [[NSRunLoop currentRunLoop] runMode:NSDefaultRunLoopMode beforeDate:[NSDate distantFuture]]; } NSLog(@"---- tread end -----"); }]; [self.thread start]; } - (void)threadAction { NSLog(@"%s", __func__); } - (void)dealloc { NSLog(@"%s", __func__); [self stop:nil]; } - (IBAction)stop:(id)sender { if (!self.thread) { return; } [self performSelector:@selector(stopThread) onThread:self.thread withObject:nil waitUntilDone:NO]; } - (void)stopThread { self.stoped = YES; CFRunLoopStop(CFRunLoopGetCurrent()); self.thread = nil; NSLog(@"%s", __func__); } - (void)touchesBegan:(NSSet<UITouch *> *)touches withEvent:(UIEvent *)event { if (!self.thread) { return; } [self performSelector:@selector(threadAction) onThread:self.thread withObject:nil waitUntilDone:NO]; NSLog(@"%s", __func__); }
但此时直接退出界面或者主动触发 stop,会出现 crash,因为此时 stopThread 和 dealloc 方法是同事进行的,这里需要保证先执行 stopTread,然后在执行 dealloc。所以这里需要把 waitUntilDone 方法设置为 YES:
1
2
3
4
5
6
7
- (IBAction)stop:(id)sender { if (!self.thread) { return; } [self performSelector:@selector(stopThread) onThread:self.thread withObject:nil waitUntilDone:YES]; }
完美解决~
简单来封装下 thread:
1
2
3
4
5
6
7
8
9
10
11
12
13
14
15
16
17
18
19
20
21
22
23
24
25
26
27
28
29
30
31
32
33
34
35
36
37
38
39
40
41
42
43
44
45
46
47
48
49
50
51
52
53
54
55
56
57
58
59
60
61
62
63
64
65
66
67
68
@interface XFThread : NSThread @end @implementation XFThread - (void)dealloc { NSLog(@"%s", __func__); } @end @interface XFPermenentThread : NSObject - (void)stop; - (void)executeTask:(dispatch_block_t)task; @end @interface XFPermenentThread () @property (nonatomic, strong) XFThread * innerThread; @property (nonatomic, assign, getter=isStopped) BOOL stopped; @end @implementation XFPermenentThread - (instancetype)init { self = [super init]; if (self) { self.stopped = NO; typeof(self) __weak weakSelf = self; self.innerThread = [[XFThread alloc] initWithBlock:^{ [[NSRunLoop currentRunLoop] addPort:[[NSPort alloc] init] forMode:NSDefaultRunLoopMode]; while (weakSelf && !weakSelf.isStopped) { [[NSRunLoop currentRunLoop] runMode:NSDefaultRunLoopMode beforeDate:[NSDate distantFuture]]; } }]; [self.innerThread start]; } return self; } - (void)stop { if (!self.innerThread) { return; } [self performSelector:@selector(__stop) onThread:self.innerThread withObject:nil waitUntilDone:YES]; } - (void)executeTask:(dispatch_block_t)task { if (!self.innerThread || !task) { return; } [self performSelector:@selector(__executeTask:) onThread:self.innerThread withObject:task waitUntilDone:NO]; } - (void)dealloc { NSLog(@"%s", __func__); [self stop]; } - (void)__stop { self.stopped = YES; CFRunLoopStop(CFRunLoopGetCurrent()); self.innerThread = nil; } - (void)__executeTask:(dispatch_block_t)task { !task ? : task(); } @end
至此我们可以做到手动控制一条线程的生命周期。
参考 :
YY 大神:https://blog.ibireme.com/2015/05/18/runloop/#more-41710
官方源码:https://opensource.apple.com/tarballs/CF/


