最近时间比较散,还有就是公司比较动荡😌,当初怀着一颗做事的心来到这里,没想到最后落得这样的结局。不说了,还是保持本心比较好,尽管想做好飞读,但是我们小职员也改变不了什么。做好自己的事情就好,按着学习计划继续。。。
定时器 iOS 的内存管理必然少不了定时器,以前没有深究过具体的原理,只知道 timer 会对 target 产生强引用,现在来分析下为什么会产生强引用以及怎样解决。
先来看一段测试代码:
1
2
3
4
5
6
7
8
- (void)testTimer { self.timer = [NSTimer timerWithTimeInterval:1 target:self selector:@selector(timerAction) userInfo:nil repeats:YES]; [[NSRunLoop currentRunLoop] addTimer:self.timer forMode:NSRunLoopCommonModes]; } - (void)timerAction { NSLog(@"-- %s", __func__); }
如上,当我们销毁控制器时没有调用 dealloc 方法, 说明此时有循环引用。之前只是知道 timer 会对 self 产生强引用,那么具体怎么产生的呢,这里可以看一下 GNU 源码:
1
2
3
4
5
6
7
8
9
10
11
12
13
14
15
16
17
18
19
20
21
22
23
24
25
26
27
28
29
30
31
32
33
34
35
- (id) initWithFireDate: (NSDate*)fd interval: (NSTimeInterval)ti target: (id)object selector: (SEL)selector userInfo: (id)info repeats: (BOOL)f { if (ti <= 0.0) { ti = 0.0001; } if (fd == nil) { _date = [[NSDate_class allocWithZone: NSDefaultMallocZone()] initWithTimeIntervalSinceNow: ti]; } else { _date = [fd copyWithZone: NSDefaultMallocZone()]; } _target = RETAIN(object); _selector = selector; _info = RETAIN(info); if (f == YES) { _repeats = YES; _interval = ti; } else { _repeats = NO; _interval = 0.0; } return self; }
如上可以看出 timer 会对 target 做一次 retain 操作,这也就解释了为什么使用 __weak 解决不了循环引用的问题,因为不管 target 传入 self 还是 weakSelf,timer 都会对 self 做一次 retain 操作。
要想解决循环引用,那么直接的办法就是添加一个中间代理,使用到了 NSProxy:
1
2
3
4
5
6
7
8
9
10
11
12
13
14
15
16
17
18
19
20
@interface TargetProxy : NSProxy @property (nonatomic, weak) id target; + (instancetype)proxyWithTarget:(id)target; @end @implementation TargetProxy + (instancetype)proxyWithTarget:(id)target { TargetProxy * proxy = [TargetProxy alloc]; proxy.target = target; return proxy; } - (NSMethodSignature *)methodSignatureForSelector:(SEL)sel { return [self.target methodSignatureForSelector:sel]; } - (void)forwardInvocation:(NSInvocation *)invocation { [invocation invokeWithTarget:self.target]; } @end
这样就能解决循环引用的问题。这里还有一个注意点:当程序退到后台时 timer 就会停止,因为 timer 是基于 RunLoop 的,如之前 RunLoop 章节所讲, timer 也是不精准的。可以通过添加 observer 来验证我们的猜想,当程序退到后台时,最终会走到 kCFRunLoopBeforeWaiting 状态,从而 timer 停止工作,当程序从后台回到前台时,RunLoop 又从 kCFRunLoopAfterWaiting 状态开始执行:
1
2
3
4
5
6
7
8
9
10
11
- (void)viewDidLoad { [super viewDidLoad]; [self testTimer]; CFRunLoopObserverRef observer = CFRunLoopObserverCreateWithHandler(kCFAllocatorDefault, kCFRunLoopAllActivities, YES, 0, ^(CFRunLoopObserverRef observer, CFRunLoopActivity activity) { NSLog(@"%lu", activity); }); CFRunLoopAddObserver(CFRunLoopGetMain(), observer, kCFRunLoopCommonModes); CFRelease(observer); }
CADisplayLink 原理和 NSTimer 相同。
如果想要更精准的设置 timer,我们可以使用 GCD 来实现:
1
2
3
4
5
6
7
8
9
10
11
12
13
14
15
16
17
18
19
20
21
22
23
24
25
26
27
28
29
30
31
32
33
34
35
36
37
38
39
40
41
42
43
44
45
46
47
48
49
50
51
52
53
54
55
56
57
58
59
60
61
62
63
64
65
66
67
68
69
70
71
72
73
74
75
76
77
78
79
80
81
82
83
84
85
86
87
88
89
@interface CTTimer : NSObject + (id)executeTask:(dispatch_block_t)task start:(NSTimeInterval)star interval:(NSTimeInterval)interval repeates:(BOOL)repeates async:(BOOL)async; + (id)executeWithTarget:(id)target action:(SEL)action start:(NSTimeInterval)star interval:(NSTimeInterval)interval repeates:(BOOL)repeates async:(BOOL)async; + (void)cancelTask:(id)key; @end @implementation CTTimer static NSMutableDictionary * timers_; dispatch_semaphore_t semphore_; + (void)initialize { timers_ = [NSMutableDictionary dictionary]; semphore_ = dispatch_semaphore_create(1); } + (id)executeTask:(dispatch_block_t)task start:(NSTimeInterval)star interval:(NSTimeInterval)interval repeates:(BOOL)repeates async:(BOOL)async { if (!task || star < 0 || (interval < 0 && repeates)) { return nil; } static dispatch_queue_t _queue; static dispatch_once_t onceToken; dispatch_once(&onceToken, ^{ _queue = dispatch_queue_create("queue timer", DISPATCH_QUEUE_CONCURRENT); }); dispatch_queue_t timerQueue = async ? _queue : dispatch_get_main_queue(); dispatch_source_t timer = dispatch_source_create(DISPATCH_SOURCE_TYPE_TIMER, 0, 0, timerQueue); dispatch_source_set_timer(timer, dispatch_time(DISPATCH_TIME_NOW, star), interval * NSEC_PER_SEC, 0 * NSEC_PER_SEC); dispatch_semaphore_wait(semphore_, DISPATCH_TIME_FOREVER); NSString * key = [NSString stringWithFormat:@"key_%lu", (unsigned long)timers_.count]; timers_[key] = timer; dispatch_semaphore_signal(semphore_); dispatch_source_set_event_handler(timer, ^{ if (task) { task(); } if (!repeates) { [self cancelTask:key]; } }); dispatch_resume(timer); return key; } + (id)executeWithTarget:(id)target action:(SEL)action start:(NSTimeInterval)star interval:(NSTimeInterval)interval repeates:(BOOL)repeates async:(BOOL)async { if (!target || !action) { return nil; } return [self executeTask:^{ if ([target respondsToSelector:action]) { #pragma clang diagnostic push #pragma clang diagnostic ignored "-Warc-performSelector-leaks" [target performSelector:action]; #pragma clang diagnostic pop } } start:star interval:interval repeates:repeates async:async]; } + (void)cancelTask:(id)key { if (!key) { return; } dispatch_semaphore_wait(semphore_, DISPATCH_TIME_FOREVER); dispatch_source_t timer = timers_[key]; if (timer) { dispatch_source_cancel(timer); [timers_ removeObjectForKey:key]; } dispatch_semaphore_signal(semphore_); } @end
iOS 程序内存布局 iOS 内存布局如下所示:
来做个简单验证:
1
2
3
4
5
6
7
8
9
10
11
12
13
14
15
16
17
18
19
20
21
22
23
24
25
26
27
28
29
30
31
32
33
34
35
36
37
38
int a = 10; int b; int main(int argc, char * argv[]) { @autoreleasepool { static int c = 20; static int d; int e; int f = 20; NSString *str = @"123"; NSObject *obj = [[NSObject alloc] init]; NSLog(@"\n&a=%p\n&b=%p\n&c=%p\n&d=%p\n&e=%p\n&f=%p\nstr=%p\nobj=%p\n", &a, &b, &c, &d, &e, &f, str, obj); return 0; } } // 结果 /* 字符串常量 str=0x10dfa0068 已初始化的全局变量、静态变量 &a =0x10dfa0db8 &c =0x10dfa0dbc 未初始化的全局变量、静态变量 &d =0x10dfa0e80 &b =0x10dfa0e84 堆 obj=0x608000012210 栈 &f =0x7ffee1c60fe0 &e =0x7ffee1c60fe4 */
Tagged Pointer
从64 bit 开始,iOS 引入了 TaggedPointer 技术,用于优化 NSNumber、NSDate、NSString 等小对象的存储。
在没有 Tagged Pointer 之前,NSNumber 等对象需要动态分配内存、维护引用计数等,NSNumber 指针存储的是堆中 NSNumber 对象的地址值。
在使用了 Tagged Pointer 之后,NSNumber 指针里面存储的数据标称了:Tag+Data,也就是将数据直接存储在了指针中。
当指针不够存储数据时,才会使用动态分配内存的方式来存储数据。
objc_msgSend 能识别 Tagged Pointer,比如 NSNumber 的 intValue 方法,直接从指针提取数据,节省了以前的调用开销。
下面来看下怎么样判断一个指针是否是 Tagged Pointer 呢。
1
2
3
4
5
6
7
8
9
10
11
12
13
14
15
16
17
18
19
20
21
22
23
24
25
26
27
28
29
30
31
32
33
34
35
36
37
static inline bool _objc_isTaggedPointer(const void * _Nullable ptr) { return ((uintptr_t)ptr & _OBJC_TAG_MASK) == _OBJC_TAG_MASK; } #if TARGET_OS_OSX && __x86_64__ // 64-bit Mac - tag bit is LSB # define OBJC_MSB_TAGGED_POINTERS 0 #else // Everything else - tag bit is MSB # define OBJC_MSB_TAGGED_POINTERS 1 #endif #if OBJC_MSB_TAGGED_POINTERS # define _OBJC_TAG_MASK (1UL<<63) # define _OBJC_TAG_INDEX_SHIFT 60 # define _OBJC_TAG_SLOT_SHIFT 60 # define _OBJC_TAG_PAYLOAD_LSHIFT 4 # define _OBJC_TAG_PAYLOAD_RSHIFT 4 # define _OBJC_TAG_EXT_MASK (0xfUL<<60) # define _OBJC_TAG_EXT_INDEX_SHIFT 52 # define _OBJC_TAG_EXT_SLOT_SHIFT 52 # define _OBJC_TAG_EXT_PAYLOAD_LSHIFT 12 # define _OBJC_TAG_EXT_PAYLOAD_RSHIFT 12 #else # define _OBJC_TAG_MASK 1UL # define _OBJC_TAG_INDEX_SHIFT 1 # define _OBJC_TAG_SLOT_SHIFT 0 # define _OBJC_TAG_PAYLOAD_LSHIFT 0 # define _OBJC_TAG_PAYLOAD_RSHIFT 4 # define _OBJC_TAG_EXT_MASK 0xfUL # define _OBJC_TAG_EXT_INDEX_SHIFT 4 # define _OBJC_TAG_EXT_SLOT_SHIFT 4 # define _OBJC_TAG_EXT_PAYLOAD_LSHIFT 0 # define _OBJC_TAG_EXT_PAYLOAD_RSHIFT 12 #endif
如上,指针是否是 Tagged Pointer 是通过 &mask 得到的,看下上面的 mask 值是区分 iPhone 和 Mac 的。
可以看到:
iOS 平台:最高有效位是 1(第64 bit)
Mac 平台:最低有效位是 1
具体的 isa 指针各个位的标识之前在 Runtime原理探究 中有讲到过。
OC 对象的内存管理 在 iOS 中,使用引用计数来管理 OC 对象的内存。
一个新创建的 OC 对象引用计数默认为 1,当引用计数器减为0,OC 对象就销毁,释放占用的内存空间。
调用 retain 会让 OC 对象的引用计数 +1,release 会 -1.
内存管理经验总结:
当调用 alloc、malloc、copy、mutableCopy 方法返回了一个对象,在不需要这个对象时,要调用 release 或者 autorelease 来释放。
想拥有某个对象,就让它的引用计数 +1,不想在拥有某个对象,就让它的引用计数 -1。
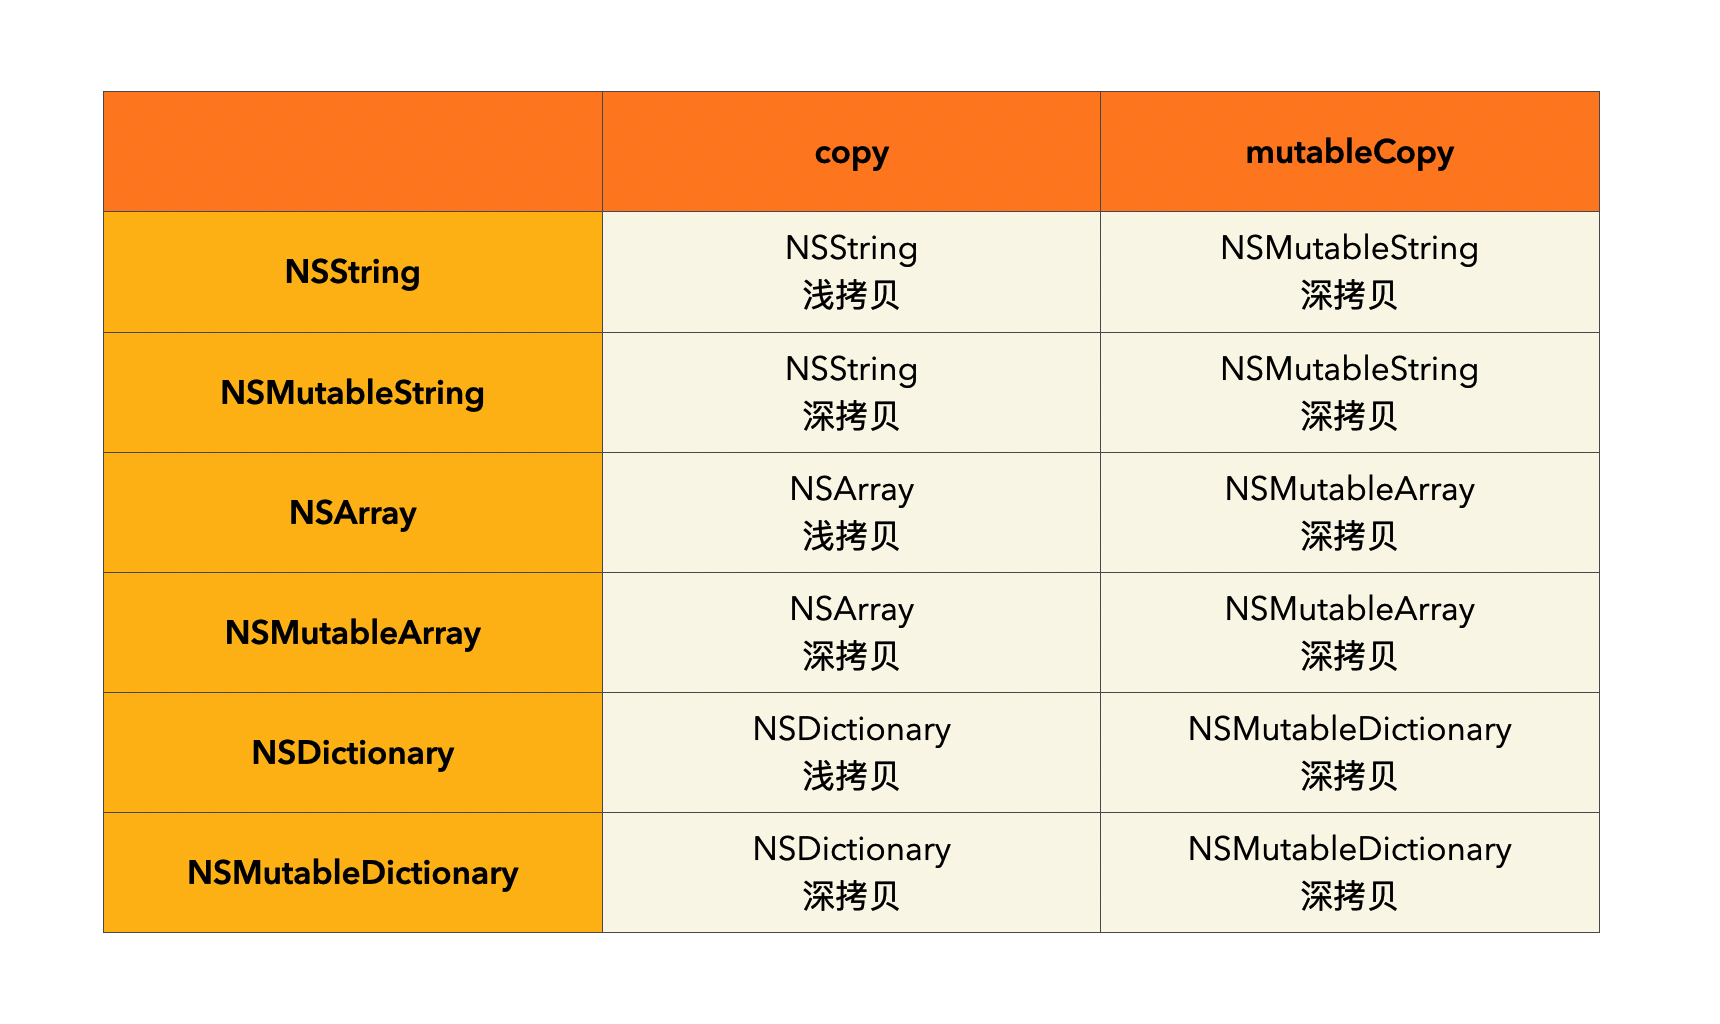
copy、mutableCopy
weak 原理 先来看下 dealloc 方法的实现:
1
2
3
4
5
6
7
8
9
10
11
12
13
14
15
16
17
18
19
20
21
22
23
24
25
26
27
28
29
30
31
32
33
34
35
36
37
38
39
40
41
42
43
44
45
46
47
48
49
50
51
52
53
54
55
56
57
58
59
60
61
62
63
64
65
66
67
68
69
70
71
72
73
74
75
inline void objc_object::rootDealloc() { if (isTaggedPointer()) return; // fixme necessary? if (fastpath(isa.nonpointer && !isa.weakly_referenced && !isa.has_assoc && !isa.has_cxx_dtor && !isa.has_sidetable_rc)) { assert(!sidetable_present()); free(this); } else { object_dispose((id)this); } } id object_dispose(id obj) { if (!obj) return nil; objc_destructInstance(obj); free(obj); return nil; } void *objc_destructInstance(id obj) { if (obj) { // Read all of the flags at once for performance. bool cxx = obj->hasCxxDtor(); bool assoc = obj->hasAssociatedObjects(); // This order is important. if (cxx) object_cxxDestruct(obj); if (assoc) _object_remove_assocations(obj); obj->clearDeallocating(); } return obj; } inline void objc_object::clearDeallocating() { if (slowpath(!isa.nonpointer)) { // Slow path for raw pointer isa. sidetable_clearDeallocating(); } else if (slowpath(isa.weakly_referenced || isa.has_sidetable_rc)) { // Slow path for non-pointer isa with weak refs and/or side table data. clearDeallocating_slow(); } assert(!sidetable_present()); } objc_object::clearDeallocating_slow() { assert(isa.nonpointer && (isa.weakly_referenced || isa.has_sidetable_rc)); SideTable& table = SideTables()[this]; table.lock(); if (isa.weakly_referenced) { weak_clear_no_lock(&table.weak_table, (id)this); } if (isa.has_sidetable_rc) { table.refcnts.erase(this); } table.unlock(); }
在 Runtime原理探究 中我们讲到过 ISA 指针的各个位的作用,在 dealloc 时如果没有 关联对象(has_assoc)、c++析构函数(has_cxx_dtor)、弱引用(weakly_referenced)、是否使用 sidetable(has_sidetable_rc) 时释放会更快。这里我们单独看一下 weak,跟到 clearDeallocating_slow 方法可以看到最终的结构:SideTable:
1
2
3
4
5
6
7
8
9
10
11
12
13
14
15
16
17
18
19
20
21
22
23
24
25
26
27
28
29
30
31
32
33
34
35
36
37
38
39
40
41
42
43
44
45
46
47
48
49
50
51
52
53
struct SideTable { spinlock_t slock; RefcountMap refcnts; weak_table_t weak_table; }; // RefcountMap disguises its pointers because we // don't want the table to act as a root for `leaks`. typedef objc::DenseMap<DisguisedPtr<objc_object>,size_t,true> RefcountMap; struct weak_table_t { weak_entry_t *weak_entries; size_t num_entries; uintptr_t mask; uintptr_t max_hash_displacement; }; typedef DisguisedPtr<objc_object *> weak_referrer_t; struct weak_entry_t { DisguisedPtr<objc_object> referent; union { struct { weak_referrer_t *referrers; uintptr_t out_of_line_ness : 2; uintptr_t num_refs : PTR_MINUS_2; uintptr_t mask; uintptr_t max_hash_displacement; }; struct { // out_of_line_ness field is low bits of inline_referrers[1] weak_referrer_t inline_referrers[WEAK_INLINE_COUNT]; }; }; bool out_of_line() { return (out_of_line_ness == REFERRERS_OUT_OF_LINE); } weak_entry_t& operator=(const weak_entry_t& other) { memcpy(this, &other, sizeof(other)); return *this; } weak_entry_t(objc_object *newReferent, objc_object **newReferrer) : referent(newReferent) { inline_referrers[0] = newReferrer; for (int i = 1; i < WEAK_INLINE_COUNT; i++) { inline_referrers[i] = nil; } } };
如上,Sidetable 包含三部分内容,lock 部分不用管,这里的 RefcountMap 就是当 ISA 指针存储不下引用计数时有 Sidetable 存储的散列表。如果 isa.has_sidetable_rc 为 true,则会调用 table.refcnts.erase(this); 清除相关的引用。
再来看下 weak_table 结构,可以看到 weak_table 不会对修饰的对象产生强引用,而当对象被 weak 修饰过,则在释放时就会调用 weak_clear_no_lock(&table.weak_table, (id)this); 方法:
1
2
3
4
5
6
7
8
9
10
11
12
13
14
15
16
17
18
19
20
21
22
23
24
25
void weak_clear_no_lock(weak_table_t *weak_table, id referent_id) { objc_object *referent = (objc_object *)referent_id; weak_entry_t *entry = weak_entry_for_referent(weak_table, referent); if (entry == nil) { return; } for (size_t i = 0; i < count; ++i) { objc_object **referrer = referrers[i]; if (referrer) { // 重点:这里将 weakReference 置为 nil if (*referrer == referent) { *referrer = nil; } else if (*referrer) { objc_weak_error(); } } } weak_entry_remove(weak_table, entry); }
如上源码所示,在释放内存时,会将相关的 weak reference 设置为 nil,这也就是为什么使用 __weak 修饰过的变量在被修饰的对象释放时能置为 nil 的原理。
ARC 就是 LLVM 编译器和 Runtime 系统相互协作的结果
Autorelease 原理 当将对象调用 autorelease 方法后,就会被加入到 自动释放池 里面,使用 clang 命令来看下 autoreleasepool 到底被编译成了什么:
1
2
3
4
5
int main(int argc, const char * argv[]) { /* @autoreleasepool */ { __AtAutoreleasePool __autoreleasepool; } return 0; }
这里被编译成了 __AtAutoreleasePool,然后在 objc 源码里面查找 autorelease 方法,最终可以看到 autorelease 的管理类:autoreleasepoolpage。
所以自动释放池的主要底层数据结构是:__AtAutoreleasePool、AutoreleasePoolPage。调用了 autorelease 的对象最终都是通过 AutoreleasePoolPage 对象来管理的。来看下 AutoreleasePoolPage 的结构:
1
2
3
4
5
6
7
8
9
10
11
12
13
14
15
16
17
18
class AutoreleasePoolPage { static size_t const SIZE = #if PROTECT_AUTORELEASEPOOL PAGE_MAX_SIZE; // must be multiple of vm page size #else PAGE_MAX_SIZE; // size and alignment, power of 2 -- 4096 #endif static size_t const COUNT = SIZE / sizeof(id); magic_t const magic; id *next; pthread_t const thread; AutoreleasePoolPage * const parent; AutoreleasePoolPage *child; uint32_t const depth; uint32_t hiwat; }
根据 AutoreleasePoolPage 定义里面的 PAGE_MAX_SIZE 可以看到占用 4096 字节的内存。除了用来存放它内存的成员变量,剩下的空间用来存放 autorelease 对象的地址。
所有的 AutoreleasePoolPage 对象都是通过双向量表的形式连接在一起的。
来看下原理结构图:
调用 push 方法会将一个 POOL_BOUNDARY 入栈,并且返回其存放的内存地址。
调用 pop 方法时传入一个 POOL_BOUNDARY 的内存地址,会从最后一个入栈的对象开始发送 release 消息,直到遇到这个 POOL)BOUNDARY。
id *next 指向了下一个能存放 autorelease 对象地址的区域。
1
2
3
4
5
6
7
8
9
10
11
12
13
14
15
16
17
18
19
20
21
22
23
24
25
26
27
28
29
30
31
32
33
34
35
36
37
38
39
40
41
42
43
44
45
46
47
48
49
50
51
52
53
54
55
56
57
58
59
60
61
62
63
64
65
66
67
68
69
70
71
72
73
74
75
static inline void *push () id *dest; if (DebugPoolAllocation) { dest = autoreleaseNewPage(POOL_BOUNDARY); } else { dest = autoreleaseFast(POOL_BOUNDARY); } assert(dest == EMPTY_POOL_PLACEHOLDER || *dest == POOL_BOUNDARY); return dest; } static inline void pop (void *token) AutoreleasePoolPage *page; id *stop; if (token == (void *)EMPTY_POOL_PLACEHOLDER) { if (hotPage()) { pop(coldPage()->begin()); } else { setHotPage(nil); } return ; } page = pageForPointer(token); stop = (id *)token; if (*stop != POOL_BOUNDARY) { if (stop == page->begin() && !page->parent) { } else { return badPop(token); } } if (PrintPoolHiwat) printHiwat(); page->releaseUntil(stop); ... } void releaseUntil (id *stop) while (this ->next != stop) { AutoreleasePoolPage *page = hotPage(); while (page->empty()) { page = page->parent; setHotPage(page); } page->unprotect(); id obj = *--page->next; memset ((void *)page->next, SCRIBBLE, sizeof (*page->next)); page->protect(); if (obj != POOL_BOUNDARY) { objc_release(obj); } } }
再来看下一个变量被标记为 autorelease 后,是在什么时候 release 的。
自动释放池是有 RunLoop 控制的,加入自动释放池的变量会在某次 RunLoop 循环中,RunLoop休眠之前调用 release。
而我们平时开发时主线程的 RunLoop 中已经注册了 2 个 observer:
第一个 observer 监听了 kCFRunLoopEntry 事件,会调用 objc_autoreleasePoolPush()。
第二个 observer 监听了两个事件
kCFRunLoopBeforeWaiting 事件,会调用 objc_autoreleasePoolPop()、objc_autoreleasePoolPush()。
kCFRunLoopBeforeExit 事件,会调用 objc_autoreleasePoolPop()。
具体的应用可以看下 YY 大神的 YYKit NSThread+YYAdd 相关代码:
1
2
3
4
5
6
7
8
9
10
11
12
13
14
15
16
17
18
19
20
21
22
23
24
25
26
27
28
29
30
31
32
33
34
35
36
37
38
39
40
41
42
43
44
45
46
47
48
49
50
51
52
53
54
55
56
57
58
59
60
61
62
63
64
65
66
67
68
69
70
71
72
73
74
75
76
static inline void YYAutoreleasePoolPush() { NSMutableDictionary *dic = [NSThread currentThread].threadDictionary; NSMutableArray *poolStack = dic[YYNSThreadAutoleasePoolStackKey]; if (!poolStack) { /* do not retain pool on push, but release on pop to avoid memory analyze warning */ CFArrayCallBacks callbacks = {0}; callbacks.retain = PoolStackRetainCallBack; callbacks.release = PoolStackReleaseCallBack; poolStack = (id)CFArrayCreateMutable(CFAllocatorGetDefault(), 0, &callbacks); dic[YYNSThreadAutoleasePoolStackKey] = poolStack; CFRelease(poolStack); } NSAutoreleasePool *pool = [[NSAutoreleasePool alloc] init]; // create [poolStack addObject:pool]; // push } static inline void YYAutoreleasePoolPop() { NSMutableDictionary *dic = [NSThread currentThread].threadDictionary; NSMutableArray *poolStack = dic[YYNSThreadAutoleasePoolStackKey]; [poolStack removeLastObject]; // pop } static void YYRunLoopAutoreleasePoolObserverCallBack(CFRunLoopObserverRef observer, CFRunLoopActivity activity, void *info) { switch (activity) { // 进入 loop 时 push case kCFRunLoopEntry: { YYAutoreleasePoolPush(); } break; // loop 一圈走完,先 pop 然后在 push case kCFRunLoopBeforeWaiting: { YYAutoreleasePoolPop(); YYAutoreleasePoolPush(); } break; // 退出时 pop case kCFRunLoopExit: { YYAutoreleasePoolPop(); } break; default: break; } } static void YYRunloopAutoreleasePoolSetup() { CFRunLoopRef runloop = CFRunLoopGetCurrent(); // 当前线程添加监听:kCFRunLoopEntry、kCFRunLoopBeforeWaiting | kCFRunLoopExit CFRunLoopObserverRef pushObserver; pushObserver = CFRunLoopObserverCreate(CFAllocatorGetDefault(), kCFRunLoopEntry, true, // repeat -0x7FFFFFFF, // before other observers YYRunLoopAutoreleasePoolObserverCallBack, NULL); CFRunLoopAddObserver(runloop, pushObserver, kCFRunLoopCommonModes); CFRelease(pushObserver); CFRunLoopObserverRef popObserver; popObserver = CFRunLoopObserverCreate(CFAllocatorGetDefault(), kCFRunLoopBeforeWaiting | kCFRunLoopExit, true, // repeat 0x7FFFFFFF, // after other observers YYRunLoopAutoreleasePoolObserverCallBack, NULL); CFRunLoopAddObserver(runloop, popObserver, kCFRunLoopCommonModes); CFRelease(popObserver); } @implementation NSThread (YYAdd) + (void)addAutoreleasePoolToCurrentRunloop { // 主线程存在自动释放池,所以这里只需要在子线程中添加 if ([NSThread isMainThread]) return; // The main thread already has autorelease pool. NSThread *thread = [self currentThread]; if (!thread) return; if (thread.threadDictionary[YYNSThreadAutoleasePoolKey]) return; // already added YYRunloopAutoreleasePoolSetup(); thread.threadDictionary[YYNSThreadAutoleasePoolKey] = YYNSThreadAutoleasePoolKey; // mark the state }